Setting up a Raspberry Pi for hemispheric photography with a Witty Pi 3 real time clock
Introduction
We recently came across a paper outlining a method for monitoring forest canopy dynamics using a Raspberry Pi for hemispheric photography, suffice to say it really piqued our interest! By following this tutorial you should end up with a perfectly workable (and cheap) forest canopy monitoring camera! The paper is available here.
Materials Required
- Raspberry Pi (any with a 40-pin GPIO header)
- Witty Pi 3 Rev2
- SD Card (32GB recommended)
- Pi Fish Eye Camera
- A suitable battery power supply (for the purposes of this tutorial we will be using a DIYmore 18650 Battery Shield)
- 20,000 mAh battery bank (any should do, I went with Anker, as they're generally a reputable brand)
The above products are what, I would recommend. The Amazon links are affiliate links, so we will receive a small kickback if you buy from them. Make sure that you shop around to find the best deals.
Powering your Pi
This is perhaps the most complex aspect of this project. Modern battery banks will most likely go to sleep when they don’t detect power draw. The Witty Pi 3 does provide you the option in the “view/change other settings” menu to give pulsing power to try to trick a battery bank into staying alive, but this didn’t work with any of my battery banks.
I think that a Lead-Acid battery would probably give you the most amount of time between recharges, but you can damage them by going below 50% capacity, and I’m an intrinsically lazy human who’s definitely going to let the batteries go flat at some point. Something relatively cheap that won’t be damaged by going flat was the most suitable option for my needs.
After some deliberation I went with an 18650 battery shield, as the newer models have an “always-on mode” whilst these units themselves only have the capacity for two 18650 cells, they can be charged at the same time. This means that we can attach a standard battery bank to the 18650 shield. I get about four days before a battery recharge is required when I couple my 18650 shield with a 20,000 mAh Anker battery bank.
Install the operating system and enable the camera
We’re going to be installing Raspberry Pi OS using Raspberry Pi imager which can be found here. Flash Raspberry Pi OS to your SD card, and boot up the Pi.
Enter the terminal and type:
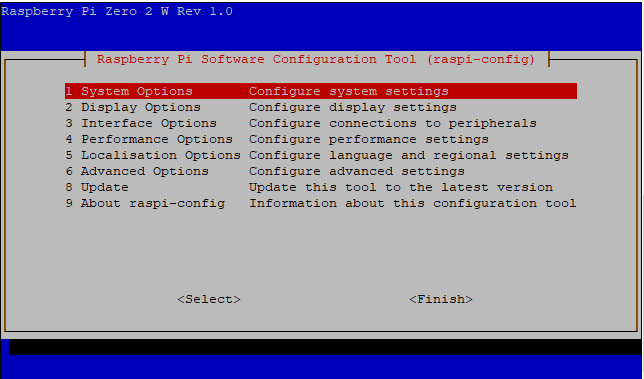
sudo raspi-config
This will bring up the display below. Select “Interface Options” and then enable “Legacy Camera”. Follow the on-screen instructions to exit and reboot the Pi.
Automatic photo script
Now we need to make our program that will automatically take our Hemispheric Photos, back in the terminal type:
sudo nano camerastart.pyThe command above will open “nano” text editor, and open an empty file called “camerastart”. Copy the content below into nano, line 27 controls how frequently our camera takes a photo, I’ve set mine to take one every 100 seconds.
#!/usr/bin/env python3
import picamera
from subprocess import call
from datetime import datetime
from time import sleep

filePath = "/home/pi/Pictures/"
picTotal = 50000
picCount = 0

while picCount < picTotal:
    # Define the current time
    currentTime = datetime.now()
    # Create file name for the picture
    picTime = currentTime.strftime("%Y.%m.%d-%H%M%S")
    picName = picTime + '.jpg'
    completeFilePath = filePath + picName

    # Take picture using new filepath
    with picamera.PiCamera() as camera:
        camera.resolution = (2592,1944)
        camera.capture(completeFilePath)
        print("Picture taken.")

    # Advance our picture counter
    picCount += 1
    sleep(100)
To save this file, type “Ctrl+X” to exit, then “Y” to save followed by “Enter” twice.
Next we will make our programme executable, in the terminal, type:
sudo chmod +x camerastart.pyOnce that’s done, we will make this programme run when the Pi starts, in the terminal, type:
sudo nano /etc/profileScroll to the bottom of the file and add:
sudo python /home/pi/camerastart.py &Where “/home/pi/camerastart.py” is the path to your camera script.
Type “Ctrl+X” to exit, then “Y” to save followed by “Enter” twice.
To make sure this all works reboot your Raspberry Pi, in the terminal, type:
sudo rebootIf everything is working correctly, when you open your terminal after reboot it will print “Picture taken” every 100 seconds.
The pictures should be stored in your “/home/pi/Pictures/” directory.
Installing software for the Witty Pi 3 Rev2
The Witty Pi 3 provides us with a Real Time Clock so we can schedule when our Raspberry Pi takes photos. It also gives us some power management options which may be useful depending on what you choose to power your Pi with. The manual can be found here.
Ensure that the Witty Pi board is not connected to your Raspberry Pi, enter the terminal, and type:
wget http://www.uugear.com/repo/WittyPi3/install.shAfter that’s finished downloading we need to install it, in the terminal type:
sudo sh install.shCreating and setting a schedule script for the Witty Pi 3 Rev2
Following installation we need to make a custom start-up / shut-down script. Head back into the terminal and navigate into the Witty Pi 3 “schedules” directory by typing:
cd /home/pi/wittypi/schedulesWe can then make our schedule file, it must have a “.wpi” extension. I’m going to call mine “photos”. In the terminal type:
sudo nano photos.wpiNow the schedule is up to you, hemispheric photography can be affected by all sorts of variables, such as your location, the weather, light intensity ad infinitum. My script is based on the times suggested by Wilkinson, Bell & Morison (2021) as their experiment was carried out in the South East of the UK not far from where I live. I want my Pi to come on for five minutes and take photos at 7.00, 7.30, 9.00, 9.30, 12.00, 12.30, 16.00 & 16.30.
If you want to make your own timing script I suggest using this resource here.
Otherwise use my timings, just copy the script below into nano.
BEGIN 2015-08-01 07:00:00
END   2027-07-31 23:59:59
ON    M5
OFF   M25
ON    M5
OFF   H1 M25
ON    M5
OFF   M25
ON    M5
OFF   H2 M25
ON    M5
OFF   M25
ON    M5
OFF   H3 M25
ON    M5
OFF   M25
ON    M5
OFF   H14 M25
Save this file by typing: “Ctrl+X” to exit, then “Y” to save followed by “Enter” twice.
Now shut down our Pi with:
sudo shutdown -h nowPlace the Witty Pi 3 board on-top of the Pi. Once you’ve installed the board make sure that you put the power input into the Witty Pi 3 and not the Raspberry Pi, use the button on the Witty Pi to turn on your Pi. Go back into the terminal and type:
cd /home/pi/wittypiHit “enter”, then type:
sudo ./wittyPi.shYou will then be greeted with this menu:
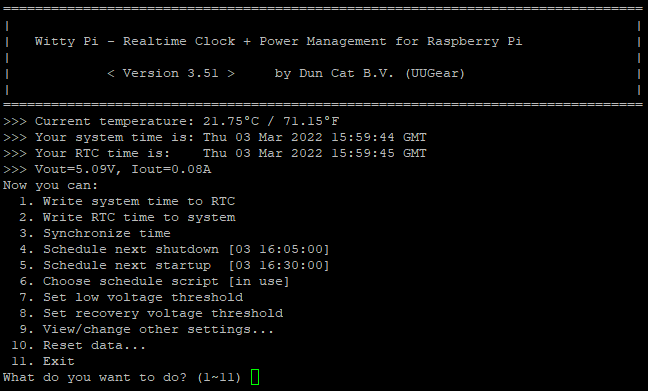
We first want to write our system time to the RTC, so press “1” to do that now. We then want to select our schedule script so hit “6” and select our “photos.wpi” script.
You’ll still be able to turn your Pi on outside of this script by pressing the button on the Witty Pi, so don’t worry about having to wait until your next scheduled start-up time.
On finishing this part of the tutorial you should have a fully working Raspberry Pi for hemispheric photography. Click the button below to move onto the next part of the tutorial.